Changing DNS Records to Point to UpStream
What are Mail eXchange (MX) Records?
Mail eXchange (MX) records are DNS entries that direct email to a specified email server for a domain. They are one of the most critical requirements for any organization since it directly impacts their ability to communicate with the outside world and are often the very first DNS records that get configured.
These MX records specify which servers handle incoming mail and in which priority order, which allows for redundancy and load balancing. Domains that are attempting to send email to the organization’s domain would look up these MX records via the public DNS tree so they can understand where to send their messages to for final delivery to the recipients.
Changing MX records is always required when implementing or changing email filtering, or adjusting transport destinations of email to new servers/services. However, given the relative infrequency of such changes, modifying MX records is a relatively uncommon practice for most Network Administrators and should be undertaken with great care, as one wrong character entry or incorrect priority number can entirely break an organization’s inbound mail flow.
MX records can be changed from a few different locations, depending on where an organization hosts their public DNS (not to be confused with private internal DNS, such as what many Active Directory servers perform within an on-premises network). This is usually within a domain registrar or hosting provider’s web portal, but can be hosted on within dedicated DNS services like CloudFlare, Microsoft Azure DNS Zones or elsewhere.
This article is designed to cover the basics on changing MX records for a few of the most popular providers and provide links to guidance on how to perform it for some of the other secondary providers out there. Please see the relevant section from the Table of Contents for your provider to get started.
Note: Even if your organization’s DNS provider is not mentioned, the syntax used for them will carry over just the same, although the exact steps to reach their DNS interface will vary.
As always, if at any point there are questions or discomfort with making the changes alone, please contact UpStream Support and we’ll walk you through the exact process for your provider.
Changing DNS Records in GoDaddy
One of the largest and most popular domain registrars out there, GoDaddy, provides public DNS services that are accessible from their web portal.
To begin, open a web browser and navigate to www.godaddy.com. Log in using the button in the upper right hand corner of the screen.
From the GoDaddy interface, click Domains, then Portfolio in the left navigation bar.
From the list of domains that appear, select the domain name that requires MX records to be changed.

Select DNS from the list of options.

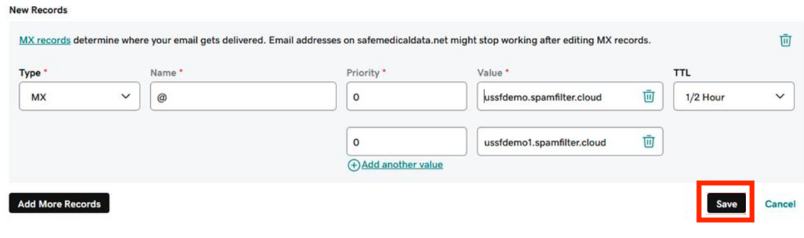
Select the black Add New Record button.

Next, fill out the appropriate information for the new MX Record.
For UpStream, this will usually be three separate MX record entries to make best use of UpStream’s high redundancy model. These specific Fully Qualified Domain Names (FQDNs) will be provided during onboarding.
Recommended settings:
Type: MX
Name: @
Priority: 0
Value: This will be the Fully Qualified Domain Name (FQDN) of the UpStream cluster your domain is being placed on. Example: USSF55.UpStreamSecurity.Net
TTL: 0.5hr
Notes on MX Settings:
Name: Using the “@” symbol bind the MX record to the parent domain
Priority: All UpStream record priority fields must be set according to the below guidelines.
A positive 16-bit integer value (0 to 65536).
Equal to each other.
Lower than every other entry, to ensure they are tried first. It is recommended all UpStream systems be given Priority 0.
Time-To-Live (TTL) threshold: Set between 30 minutes and 24 hours.
In a testing phase, it may be prudent to set the TTL threshold lower to establish more immediate changes. For example, this setting can be adjusted to 10 minutes a day in advance of the MX record changes, then switch to a longer TTL after changes have been made. This will minimize the potential window for changes to propagate around the Internet in case of a need for further changes, such as a spelling error.
After the appropriate fields have been filled out, click the black Save button.
Check the list of DNS records to ensure the changes have been saved.

MX record changes generally propagate within 15 minutes to 4 hours, but in some cases propagation may take 24 to 48 hours.
To check the status of the MX record change around the world, see the DNS Verification Process further below.
Changing DNS Records in Microsoft Azure DNS Zones
Head to the Azure portal from a web browser (located conveniently at Portal.Azure.Com) and log in using administrative credentials.
Type DNS Zones in the search bar in the upper middle of the screen, then select DNS Zones from the list of options that appears.

A list of domains under the management of the Azure tenant will appear (if more than one exist).
Select the desired domain to manage the DNS records of.
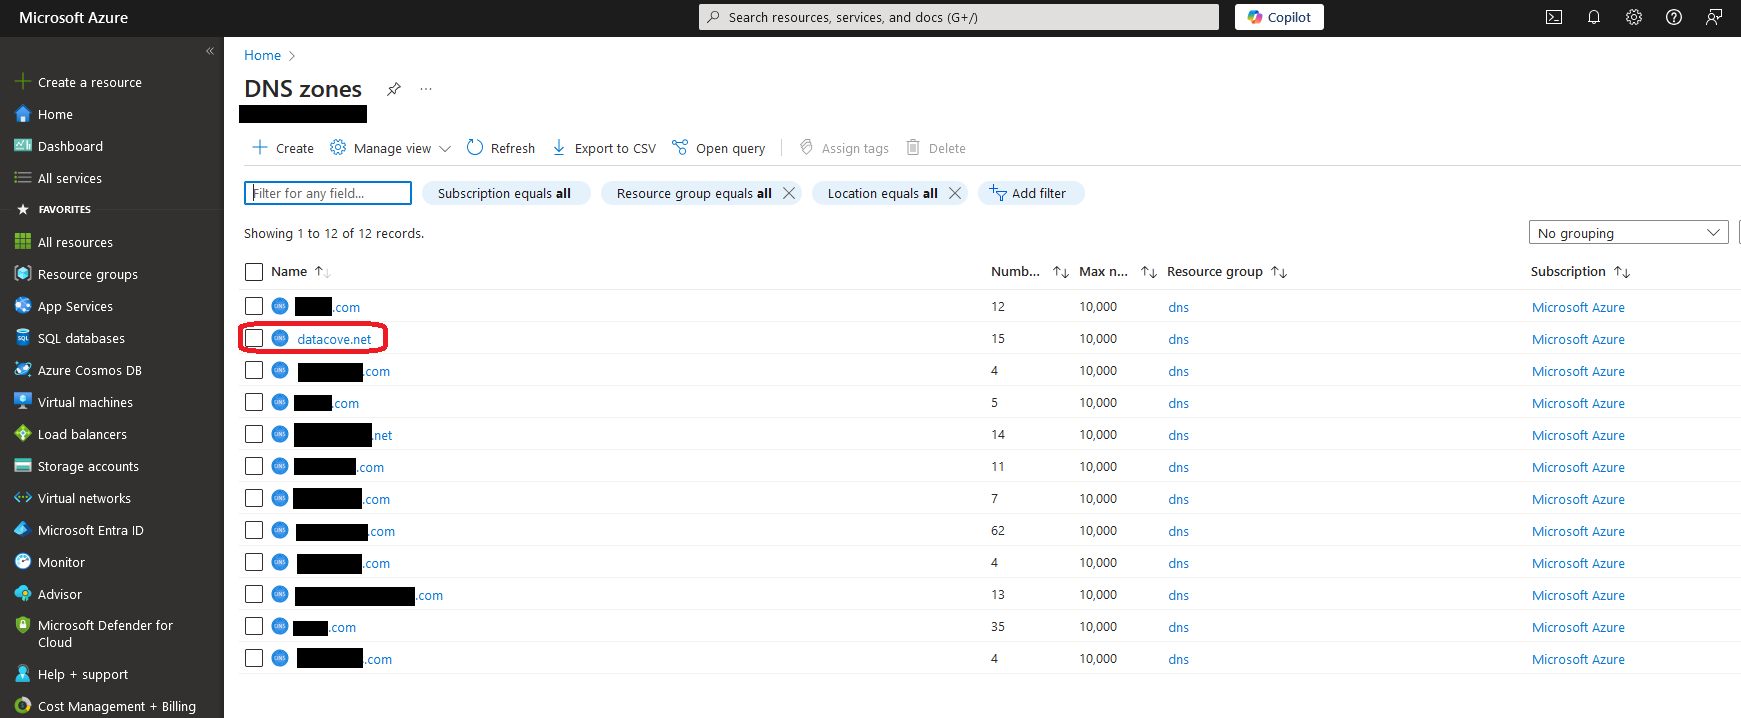
This will open that domain’s specific DNS Zone.
Select Recordsets from the list of menu options at the top of the screen.

Under Recordsets, the current DNS records of the domain will be displayed.

To add a new DNS record, find the record set labeled with the “type” of MX record. This will be the location to which the new UpStream MX records need to be added.
Click the pencil icon to the right of the row to edit the record.

Next, fill out the appropriate information for the new MX Record.
For UpStream, this will usually be three separate MX record entries to make best use of UpStream’s high redundancy model. These specific Fully Qualified Domain Names (FQDNs) will be provided during onboarding.
Recommended settings:
Type: MX
Name: @
Priority: 0
Value: This will be the Fully Qualified Domain Name (FQDN) of the UpStream cluster your domain is being placed on. Example: USSF55.UpStreamSecurity.Net
TTL: 0.5hr
Notes on MX Settings:
Name: Using the “@” symbol bind the MX record to the parent domain
Priority: All UpStream record priority fields must be set according to the below guidelines.
A positive 16-bit integer value (0 to 65536).
Equal to each other.
Lower than every other entry, to ensure they are tried first. It is recommended all UpStream systems be given Priority 0.
Time-To-Live (TTL) threshold: Set between 30 minutes and 24 hours.
In a testing phase, it may be prudent to set the TTL threshold lower to establish more immediate changes. For example, this setting can be adjusted to 10 minutes a day in advance of the MX record changes, then switch to a longer TTL after changes have been made. This will minimize the potential window for changes to propagate around the Internet in case of a need for further changes, such as a spelling error.
After the appropriate fields have been filled out, click the blue Apply button.

Once the changes apply, a small popup window in the upper right hand corner of the page will display, showing a successful save of the new record.

Upon viewing the MX record section, the UpStream records provided should now reflect back.

MX record changes generally propagate within 15 minutes to 4 hours, but in some cases propagation may take 24 to 48 hours.
To check the status of the MX record change around the world, see the DNS Verification Process further below.
Changing DNS Records in Microsoft Office 365 Domains
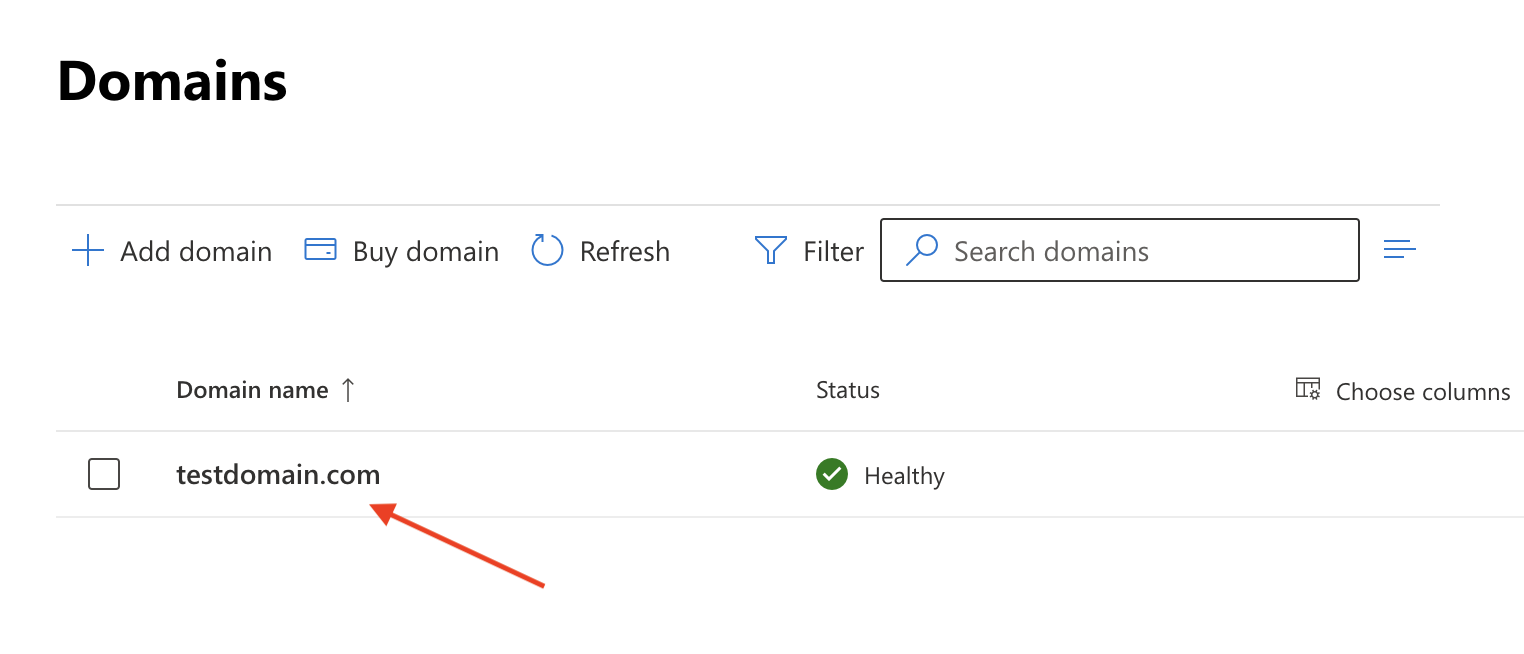
To modify MX records directly within a Microsoft Domains environment (often used in SMB scenarios that don’t have an independent DNS at the domain registrar), log into the Microsoft 365 admin center (admin.microsoft.com) and click Show all on the left-hand navigation column.

From the dropdown menu that appears, click Settings, then Domains.

From the list of domains that appears, click on the domain that requires new MX records.
Select the DNS Records tab.

Select + Add Record.

Next, fill out the appropriate information for the new MX Record.
For UpStream, this will usually be three separate MX record entries to make best use of UpStream’s high redundancy model. These specific Fully Qualified Domain Names (FQDNs) will be provided during onboarding.
Recommended settings:
Type: MX
Name: @
Priority: 0
Value: This will be the Fully Qualified Domain Name (FQDN) of the UpStream cluster your domain is being placed on. Example: USSF55.UpStreamSecurity.Net
TTL: 0.5hr
Notes on MX Settings:
Name: Using the “@” symbol bind the MX record to the parent domain
Priority: All UpStream record priority fields must be set according to the below guidelines.
A positive 16-bit integer value (0 to 65536).
Equal to each other.
Lower than every other entry, to ensure they are tried first. It is recommended all UpStream systems be given Priority 0.
Time-To-Live (TTL) threshold: Set between 30 minutes and 24 hours.
In a testing phase, it may be prudent to set the TTL threshold lower to establish more immediate changes. For example, this setting can be adjusted to 10 minutes a day in advance of the MX record changes, then switch to a longer TTL after changes have been made. This will minimize the potential window for changes to propagate around the Internet in case of a need for further changes, such as a spelling error.
Click Save once complete to apply the new records.

MX record changes generally propagate within 15 minutes to 4 hours, but in some cases propagation may take 24 to 48 hours.
To check the status of the MX record change around the world, see the DNS Verification Process further below.
Changing DNS Records with Other Providers
Given the sheer quantity of DNS providers out there, maintaining an exhaustive list of walkthroughs would be quite the challenge. To compensate, we have taken the liberty of compiling several other providers’ documentation for changing DNS records below.
If your specific provider is not listed here, let us know and we can source the respective documentation for you.
Hover: Managing DNS Records
Google Cloud DNS: Setting up MX Records
BlueHost: How to Edit MX Records
NameCheap: How to Set Up MX Records
Verifying MX Record Propagation after a DNS Record Change
The current status of a domain’s DNS records, for MX records as well as other kinds of DNS records, can be most expediently checked at www.DNSChecker.org, which will show the global propagation status of any record specified.
Basic use of DNSChecker entails placing in the fully qualified domain name of the record being looked up, then setting the dropdown menu for the kind of record it is.
Once populated, click Search to obtain a rapidly spawning list of the Record’s status across the world’s public DNS servers.

Search will normally take a few seconds to contact all of the relevant public DNS servers involved. Once complete, the results will propagate on the list on the left hand side of the screen showing which records returned for the domain specified and where the DNS servers are located.
A global map view is also provided to see where in the world the servers are sourced from.

When all or most of the locations cited come back with a green check mark referencing the desired MX records that were just added in, mail flows from these regions can be reasonably considered as ‘updated’ and will soon start arriving at the UpStream servers for final handoff.
Do note that while DNSChecker provides a rapid lookup and likely confirmation for most organizations, local email server or email service settings at any individual organization can still take up to 48 hours to fully receive the update.
In general, MX record changes are best slated for Friday evenings, after business hours, to allow for the entire weekend to pass for DNS propagation.